Автор Тема: Prognosis H0 model railroad - "The town from the dining room"  (Прочетена 271119 пъти)

prognosis

  • Гост
  • Trade Count: (0)
Re:Prognosis H0 model railroad - "The town from the dining room"
« Отговор #465 -: 11 Декември 2010, 15:19:11 »
Купи ER 20 и BR 111 Roco

H0 локомотиви се продават за събиране на тези средства за закупуване на  060 EA Delfin, че администрацията иска Blumenberg силно в Панарин Depot.

http://trenulete.info/vand-locomotiva-diesel-de-er-20-2007-siemens/

http://trenulete.info/vand-locomotiva-electrica-br-111-roco/

prognosis

  • Гост
  • Trade Count: (0)
Re:Prognosis H0 model railroad - "The town from the dining room"
« Отговор #466 -: 14 Декември 2010, 22:55:48 »
Trenulete.info, Orașul din sufragerie și Prognosis vă urează Crăciun fericit!
http://trenulete.info/trenulete-info-ora%C8%99ul-din-sufragerie-%C8%99i-prognosis-va-ureaza-craciun-fericit/

Steluțe argintii coboară acum din cerul înghețat, căzând lin pe pajiștea amintirilor de Crăciun din copilărie. Șuieratul trenulețului ce se învârte în jurul Bradului de Crăciun, mirosul cozonacilor, focul ce arde zglobiu să vă umple casa de lumină, colindele copiilor să vă aducă zâmbete pe chip, iar dragostea să vă mângâie sufletul.
La Mulți Ani! și trenulit fericit!

Vlado

  • КЖМ - България
  • Trade Count: (2)
  • Hero Member
  • *****
  • Публикации: 5620
  • Рейтинг: 659
  • Красотата е в детайла!
Re:Prognosis H0 model railroad - "The town from the dining room"
« Отговор #467 -: 15 Декември 2010, 09:17:17 »
 :) :good:

prognosis

  • Гост
  • Trade Count: (0)
Re:Prognosis H0 model railroad - "The town from the dining room"
« Отговор #468 -: 17 Декември 2010, 09:08:47 »
Small car - LED illumination - 3
http://trenulete.info/vagon-mic-% E2% 80% 93-on-light-LED-% E2% 80% 93-3 /

Further work to illuminate the small wagons.


Because the LEDs were visible through the window from a certain angle, but also for the light generated by small yellow SMD was not my liking, I continued with the third car in this series, but we improved the system. That means gaining experience, experience that I share with you, citititori passionate about trains.

We decided that the board must go up to ceiling glass and plastic that does not allow me, I decided it's time to make some changes. So I removed the plastic sector transparency for windows ....

And with a cater for a cover of the book, I cut easy and I separated from the upper windows. Attention to cut, not pressed too hard for the material is brittle. I also used the cutter to remove the hardware inside the mouth of the wagon roof.

After finishing the cut, with Revell in place I glued the windows on the side walls. On the board I planted warm white LED, 3mm diameter, we have polished the lens to change the angle of light dissipation and eliminate the beam.

To fix ceiling plate we used double-sided tape ...

The result is as effort. Light is much more realistic and also no longer see the lamps. As we proceeded to all the coaches and the post, so now there's a set of four 1-lit. The car has lights and final post as I described in that topic.

For over years, starting in 2007 dn, many people helped with various donations, supporting my work and poor novice modeller, because in this moment dream diorama is involved, because PanArin Depot reached the stage where their allows a media campaign to support the rail modeling, Sunday, December 19, a group of children will visit the diorama in my home, on which occasion I decided to donate two sets of classic cars on the axles, one being it, and two locomotives Junior Piko steam, together with related and self seals drives running Piko necessary.

I hope that in this way to encourage rail modeling among children in Slobozia, offering little that I have, like me and have been made donations to support the right time. Fri celebrations, an occasion to regain our hearts with goodness and love the good God has endowed us, but which we use so little for the rest.


prognosis

  • Гост
  • Trade Count: (0)
Re:Prognosis H0 model railroad - "The town from the dining room"
« Отговор #469 -: 04 Януари 2011, 17:33:25 »
Vagonul de calatori Wt 11 311 – Lima
http://trenulete.info/vagonul-de-calatori-wt-11-311-lima/

Cu o particularitate destul de evidenta, acest vagon produs de Lima este ceva mai reusit decat alte vagoane Lima care au trecut pe la mine. Impresia artistica este generata de accesoriile din cutie. Un set de burdufuri, cuple si amortizoare, pentru varianta cu burduful cuplat, adica intins, un set cu burdufurile stranse, precum si platforma de trecere dintre vagoane, articulata. Cu multe detalii si ingrijit lucrat, produsul te incanta la prima vedere. Spun asta pentru ca o data pus pe linii, magia dispare si face loc dezamagirii. Boghiele prezinta un grad redus de mobilitate in plan orizontal dar si vertical, facand deraierea constanta si producand o mare cantitate de injurii pe metrul liniar de cale ferata.

Problema este simplu de rezolvat, dupa ce se reuseste demontarea completa a vagonului, prin largirea in plan inainte-inapoi a gaurii in care intra axul boghiului, astfel incat boghiul capata o mai mare mobilitate. Pentru rezolvarea deraierii in curbe, este deajuns sa inlocuiti osiile standard Lima, cu axul din plastic, care tin rotile la maxim presate in interiorul sinei. Schimbarea acestora este necesara si pentru introducerea iluminatului cu un minim de interventii. Eu am inlocuit osii cu unele izolate pe o parte, de la Piko, osii la care am ajustat distanta ditre roti, reducand astfel incat osiile sa joace usor intre cele doua sine. In acest mod, am rezolvat problema deraierii vagonului.
Pentru ca tot am desfacut integral vagonul, am imbunatatit imaginea interiorului vopsind canapelele cu maro Revell si podeaua cu bronz aluminiu si astfel am obtinut si efectul de amplificare a luminii prin reflexia din podea.
Pentru colectarea tensiunii, lamele de la Rally sunt ineficiente, dat fiind lungimea boghiului. Ca atare am folosit pentru lamele, fasie de tabla elastica de cupru, taiata in latime de 2,5 mm si pe lungimea de 46 mm, de care am lipit un fir facut din trei fire litate impletite, ca sa dea elasticitate si ca sa treaca usor prin gaura originala din mijlocul axului boghiului, fara a mai fi nevoie alta interventie.
Pentru plafon, am realizat un sistem pe baza de folie de forex de 2,5 mm grosime. Am dorit sa fac un model la care sa nu folosesc placa de circuit, tinand cont ca multi dintre modelisti nu au acasa posibilitatea scrierii si decaparii in acid a placilor de circuit. Se poate folosi cu succes si placa de circuit pentru teste. Eu am folosit forex pe care am plantat ledurile alb-cald, polizate in cap pentru inlaturarea lentilei, si contactor de fir de cupru de la cablu de retea pentru legaturile intre led-uri. Am folosit principiul celor 4 diode montate la capete doua cate doua, pentru redresarea curentului, astfel incat plafonierele sa arda indiferent de sensul de mers. Ingroparea ledurilor in forex a creat inca un avantaj, ascunzand astfel corpul diodei, afara ramanand numai o jumatate de milimetru din caparul polizat al diodei led.

Initial am folosit numai 4 led-uri in paralele si inseriate cu un rezistor de 620 ohmi, dar pentru ca se luminau prea putine compartimente, am marit la 7 leduri inseriate cu un mini bec de 12 volti in loc de rezistor. Practic sunt iluminate individual 7 compartimente din 8 posibile.

Astfel, un vagon ce mi-a produs multa panica la primul rulaj, a ajuns sa ruleze perfect si sa dispuna si de iluminat corect in compartimente. Maine urmeaza si perechea sa!


prognosis

  • Гост
  • Trade Count: (0)
Re:Prognosis H0 model railroad - "The town from the dining room"
« Отговор #470 -: 10 Януари 2011, 14:07:12 »
ДВУСТАЕН 64 Gutzold на диорама на прогноза

http://trenulete.info/br-64-gutzold-pe-diorama-lui-prognosis/

Малко филми и някои нови снимки на гратисен Прогноза Diorama е през 2011 г., годината, в която всички ние искаме най-доброто.

2010 година е достатъчно лошо модели, поне за мен, но аз се зарадвах, когато видях, че насърчаване на железопътния моделиране в Румъния е направила някои стъпки! Аз искрено желание, че тази година клубът да бази и да се премести Ialomita диорама modelism железопътна в изложбеното пространство. Обещавам! За политиците, разбира се!

http://www.youtube.com/watch?v=8ABPa5jZBeI

prognosis

  • Гост
  • Trade Count: (0)
Re:Prognosis H0 model railroad - "The town from the dining room"
« Отговор #471 -: 11 Януари 2011, 10:47:44 »
Trams in Constanta route freeware download

[img] http://trenulete.info/wp-content/uploads/2011/01/Site-Ruta-Constanta.jpg [/ img]

This route is freeware, but can only be provided to me by selected sites on the Internet for dissemination. The route contains texture files, buildings and vehicles whose copy was allowed from the Internet freeware routes, the tram route is Stadtbahn U79. Each type of sale and transfer (Ebay, Download, file sharing, etc.) is strictly prohibited. It is not permitted to offer patches that alter in any route, railway line or the general appearance and acodul without consulting me.

All installation details, rolling stock and accessories can dowload FREE
http://trenulete.info/ruta-constanta-trams-la-download-2/

anubis

  • Trade Count: (5)
  • Sr. Member
  • ****
  • Публикации: 327
  • Рейтинг: 28
  • HO
Re:Prognosis H0 model railroad - "The town from the dining room"
« Отговор #472 -: 12 Януари 2011, 01:15:59 »
This tram looks very modern and comfortable.Where is made? I am just curious which cities in Romania still use trams public transport and do they develope and modernize his net and rolling stock.

prognosis

  • Гост
  • Trade Count: (0)
Re:Prognosis H0 model railroad - "The town from the dining room"
« Отговор #473 -: 17 Януари 2011, 10:34:39 »
Sybille Auhagen House of Assembly kit code 12223


A very easy kit, made over Auhagen, without burrs, with songs performed correctly, less than the eaves where the roof does not have the correct edge gluing them accordingly.

http://trenulete.info/casuta-sybille-de-la-auhagen/

The diorama or window, the box can be equipped with interior lighting. Final appearance matters a lot if we take care to clean the excess glue with fine sandpaper. You see, house is very beautiful and stylish. The appearance can be improved if they mount in the attic, terrace or balcony various accessories, tables, chairs, umrelute, characters.


I'd really wanted to breed and train depot in Slobozia. Unfortunately not able to obtain plans of these buildings. Everybody tells me that is secret, as are strategic objectives and as such can not provide documentation .... more laughter! Country's rush and his secret Institutionescu Voda ...
« Последна редакция: 17 Януари 2011, 10:36:56 от prognosis »

prognosis

  • Гост
  • Trade Count: (0)
Re:Prognosis H0 model railroad - "The town from the dining room"
« Отговор #474 -: 17 Януари 2011, 16:01:54 »
Box Mounting Kit Auhagen Michaela from code 11 387 [/ b]

http://trenulete.info/casuta-michaela-de-la-auhagen/

This kit from Auhagen is my favorite box diorama. It worked even a little more care than Sybille, but also has its drawbacks. Dies are slightly better than the laSybille, not so much for deburring. Problems arise when installing the fence, which does not match the concrete platform and you can interfere with adjustment pieces of concrete. No explanatory drawing when the fence is not relevant. We must carefully study the picture on the box and comes as a little insight. In fact, mold is the only hurdle that needs to intervene heavily to remove burrs and ugly edges of the mold pieces, slightly unbalanced, hence the inconveniences.

Finally, one gets a paper plate, resulting in little of note 7 to Auhagen company. With some of its problems, is more fun to Mihaela box assembly, no need to intervene with massive trimming, cutting tracks if the tracks close to the branch.


prognosis

  • Гост
  • Trade Count: (0)
Re:Prognosis H0 model railroad - "The town from the dining room"
« Отговор #475 -: 20 Януари 2011, 17:13:33 »
Chart no. Set of 20 drawings from STIPP, set the first time we presented the construction shed built since 2009.

Presented on A4 paper, the various pieces of this set are very easy to accomplish and results in much more expensive than a plastic box kitt. The process is relatively simple. I have complicated things a bit, adding the sheet of paper a more solid support, ie 1 mm thick pressboard cardboard to give an increased stability of the building. It can be done by two methods. Whether simply cutting and pasting parts of their sketch, only paper or print them on school bond, cardboard cut pressboard walls, installation of the house and then pasting the sticker. I used an intermediate approach, ie we cut pressboard walls, I cut out the design on paper and after assembling the walls, I stuck with paper prenadez model.

We started with clamps but under the roof support, as I said, stuck with the cardboard backing prenadez pressboard 1 mm thick and cut with the climb and then rip. As we proceeded with the roof plate, which I left to dry.

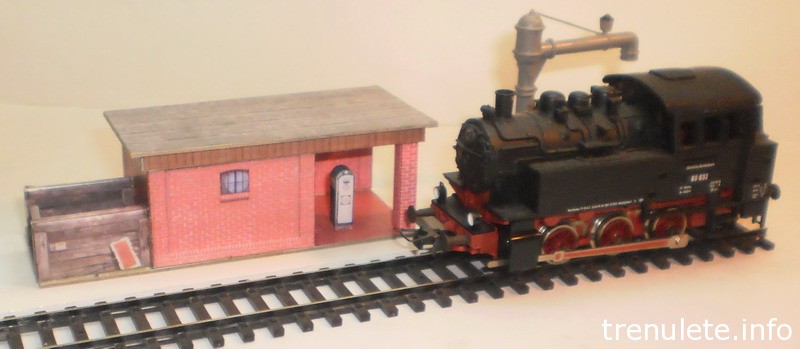
I went on the walls to the coal bunker, which is about 2 mm thick, used as the inner support pieces of corrugated cardboard perfume boxes (packaging), thick cardboard and proper that I pasted paper model prenadez. Bunker is a reproduction of a wooden model.

Camera magazine is executed as described above. Sure, you can cut the window as we made the draw to be mounted inside luminaa. Prodecat I did not want to fill out so that only an outdoor lighting pole, such as those made by my home and I will not put the light inside

This building presents a back wall, 3mm thick, like a protective wall and integral with the rear wall of the warehouse. We used to provide indoor (in paper), the same forex board thickness, polished to catch prenadezul, on which I glued and folded paper by the same process model as described in the introduction.

Platform to support the magazine, was made by gluing all paper model hard pressboard, which I mounted the box walls and rear wall with coal bunker, after which I added to strengthen the roof and clamps above.

As we proceeded with the pillar of support and diesel pump, but worked directly from the paper. I do not recommend the use of polyvinyl acetate because the paper absorbs moisture model and curls. I worked two such shops, one of the original paper, copied from a Xerox color (laser) on the school bond. This process is simpler for use prenadezului remove, but it requires attention to fixing any further niscare not allowed. prenadezul let you move but a few minutes adjusting the correct position paper printed decoration.

It follows that after drying and curing, to do the finishing touches to creoiane colored pens or paper where the combination is too obvious, adding exterior lights and a white LED lighting pole-warm, decorate with flowers or ivy and arba, aging and dirt here and there, in important respects.

It follows a simple but beautiful work for modelers unpretentious, it appears that no relief from joining hollow bricks, but quite pleasant to the viewer. A simple layout and easy to do, the time being about 2-3 hours of work.

The set of plans includes several buildings that you try to accomplish in coming days and I will present after completion. Who needs these models can contact me!


http://trenulete.info/cladirea-loktankstelle-de-la-stipp/

prognosis

  • Гост
  • Trade Count: (0)
Re:Prognosis H0 model railroad - "The town from the dining room"
« Отговор #476 -: 21 Януари 2011, 16:39:40 »
I continued this work, first making charcoal from wood bunker. I used a piece of pulp with coarse as to resemble pieces of coal, cut the size of the bunker interior painted matt black and REVELL.

After installation, I used a stick to clean ears, soaked in paint thinner and paint the areas that I stretched to reach. We spread the misery as artistically ... on corners, on walls in the neighborhood, the roof, columns and floors.

Using colors I vacsuit edges cuts close to the roof and walls so as to give a touch of old and dirty.

Unfortunately, so have problems with images not currently make only one picture here. The rest can be seen here:
http://trenulete.info/cladirea-loktankstelle-de-la-stipp/ I apologize for sending board members.


Vlado

  • КЖМ - България
  • Trade Count: (2)
  • Hero Member
  • *****
  • Публикации: 5620
  • Рейтинг: 659
  • Красотата е в детайла!
Re:Prognosis H0 model railroad - "The town from the dining room"
« Отговор #477 -: 21 Януари 2011, 16:45:48 »
 :clapping: :clapping: :clapping: Good job!!!

prognosis

  • Гост
  • Trade Count: (0)
Re:Prognosis H0 model railroad - "The town from the dining room"
« Отговор #478 -: 21 Януари 2011, 17:50:02 »
Cladirea Spritzenhaus de la Auhagen Stipp http://trenulete.info/cladirea-spritzenhaus-de-la-auhagen-stipp/


Another construction paper, all Stipp Auhagen the set is Spritzenhaus magazine (ie, where the Germans are going to drink on lunch break  :on_the_quiet: ...)

Using the same methods as Loktankstelle building, I realized two fitting parts, the warehouse itself and covered shed next to her. I started to shed, whose walls I lined 2mm thick pressboard. To bend the edges correctly, we used plastic boxes from sidewalks, on whose edges have decorative paper bent elbow.

To store, we doubled the pressboard walls 1 mm thick, cut as the design of a building inside which I did, I stuck to the walls of paper.

Mounting cardboard walls was easier if I used the original attachment, self-adhesive paper that is used in the application of prices on various products to stores, which for the time set apart walls.

I lined the interior walls of the school bond cream, to give shade painted wall and floor I used all school bond gray. We cut doors bulge to make them functional. Doors are made separately so that they open. Instead we used a gummed hinge stuck between decorative surface. Edges with the color we painted the door. Inside, the two decorative layers, we placed a piece of cardboard cards to strengthen the door surface.

At present, the collection Auhagen, I have worked on these buildings.

the remaining station buildings and office administration to move the depot, which realize them-meaning the next few days. Finally, all these new buildings will decorate mini-diorama piece, which will be connected to the diorama's Prognosis, a small part of the depot will be 3-4 times, revolving plate and other accessories, all made in home made style, paper and forex. In parallel work on board and automotorul revolving mixer.

prognosis

  • Гост
  • Trade Count: (0)
Re:Prognosis H0 model railroad - "The town from the dining room"
« Отговор #479 -: 22 Януари 2011, 17:34:11 »
Stipp Auhagen Briescht the building - no body. 1
http://trenulete.info/cladirea-briescht-de-la-auhagen-stipp/

Depot buildings set to continue Auhagen Briescht combination of no board I worked today. 1, corresponding to the largest building in the last grouping, which represents the station, stores and office moving freight and parcels.

Chart no. 1, the station's main building, is the central part, which binds all other bodies, was first on the list naturally.
In this building we decided to cut out windows and mounting them in relief, so that building can be equipped with interior lighting. To this must be cut to window frames climb on board printed

Then, the two sides of the walls of the sample mounts after all edges have been bent at odds.

The 1 mm thick pressboard, cut replicates the walls and windows and doors are cut so that light can pass from inteior. Drawing is done by aligning the correct model of pressboard cut piece printed with pencil and tracing decupaturilor circumference so that they overlap perfectly fitting.

Duplicates for mounting on walls, taking care to match deculajele well, stick with the model prenadez printed on the back and make sure you have tape on the seam position until stiff. Follow clippings shaping interiors with soft brush and a color as close to the printed pattern. I gave a pale brown brick.

Follow cutting and pasting their backup windows as centered within the building, each in the right place so unacceptable to see any light through the windows and the model to gain depth in their right.

After a first test of flatness and fixing windows and joints following minor changes to the mail box manufacturing. I have also added outside the window sills, which we painted a suitable color.

Meanwhile, sticks, cardboard, pressboard dubbed the roof and let it dry.

After drying, I painted the roof with gray bottom, in areas where we can see from the outside underneath. After drying I glued to the roof and I pressed the correct position better because light can not penetrate the bond among the edges. For safety, stick adhesive paper inside is dark for the entire length of the joints.

Finally I made of 3 mm thickness and forex steps to the side door. No follow making body. 2. Finally, chimneys will be installed and will add vegetation and lighting.